Sharepoint Power Shell Create a Site Collection in a Specific Data Base
By default, Site collections are created on the web application database. If you want to create a Site Collection in a diferent database, you can use the following Script:
#Create the Database
New-SPContentDatabase -Name New_Content_DB -WebApplication http://myWebApplication
#Create the Site Collection
New-SPSite http://myWebApplication/newSite -OwnerAlias <owner account name including domain name e.g.domain\username> -ContentDatabase New_Content_DB -Name <Name of your site collection> -Description <Description of site collection> -Template “STS#0”
Reference: http://technet.microsoft.com/en-us/library/ff607937.aspx
You should also configure your WebApplication Paths to be able to create your site collection in a specific url.
http://technet.microsoft.com/en-us/library/cc261845.aspx#section1
Sharepoint 2013 – Configure Search with Power Shell
The following script will configure the Search Service and Components on a SharePoint 2013 Server:$AppSearch = "SERVERNAME" $SearchAppPoolName = "SharePoint_SearchApp" $SearchAppPoolAccountName = "domain\username" $SearchServiceName = "SharePoint_Search_Service" $SearchServiceProxyName = "SharePoint_Search_Proxy" $DatabaseName = "SharePoint_Search_AdminDB" #Create a Search Service Application Pool $spAppPool = New-SPServiceApplicationPool -Name $SearchAppPoolName -Account $SearchAppPoolAccountName -Verbose #Start Search Service Instance on all Application Servers Start-SPEnterpriseSearchServiceInstance $AppSearch -ErrorAction SilentlyContinue Start-SPEnterpriseSearchQueryAndSiteSettingsServiceInstance $AppSearch -ErrorAction SilentlyContinue #Create Search Service Application $ServiceApplication = New-SPEnterpriseSearchServiceApplication -Partitioned -Name $SearchServiceName -ApplicationPool $spAppPool.Name -DatabaseName $DatabaseName #Create Search Service Proxy New-SPEnterpriseSearchServiceApplicationProxy -Partitioned -Name $SearchServiceProxyName -SearchApplication $ServiceApplication $clone = $ServiceApplication.ActiveTopology.Clone() $AppSSI = Get-SPEnterpriseSearchServiceInstance -Identity $AppSearch #Configure Search Components New-SPEnterpriseSearchAdminComponent –SearchTopology $clone -SearchServiceInstance $AppSSI New-SPEnterpriseSearchContentProcessingComponent –SearchTopology $clone -SearchServiceInstance $AppSSI New-SPEnterpriseSearchAnalyticsProcessingComponent –SearchTopology $clone -SearchServiceInstance $AppSSI New-SPEnterpriseSearchCrawlComponent –SearchTopology $clone -SearchServiceInstance $AppSSI New-SPEnterpriseSearchQueryProcessingComponent –SearchTopology $clone -SearchServiceInstance $AppSSI $PrimaryIndexLocation = "C:\Data" $ReplicaIndexLocation = "D:\Data" #We need two index partitions and replicas for each partition. Follow the sequence. New-SPEnterpriseSearchIndexComponent –SearchTopology $clone -SearchServiceInstance $AppSSI -RootDirectory $PrimaryIndexLocation -IndexPartition 0 New-SPEnterpriseSearchIndexComponent –SearchTopology $clone -SearchServiceInstance $AppSSI -RootDirectory $ReplicaIndexLocation -IndexPartition 1 $clone.Activate()
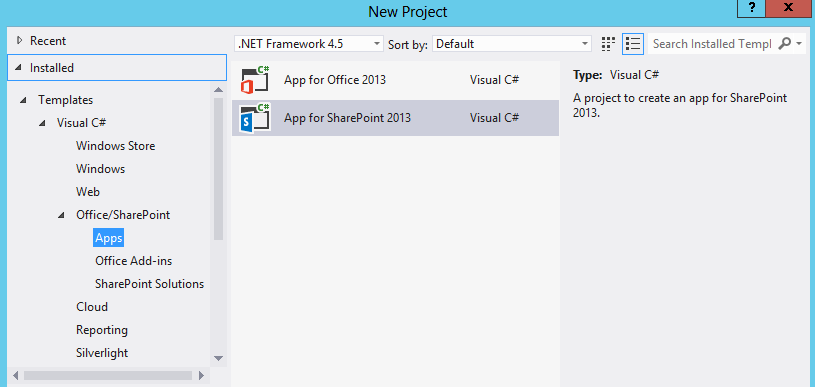
Sharepoint 2013 App with Custom Lists
This post is about how to create a SharePoint 2013 App in Visual Studio 2012 with a Custom List.
To start that, you need to create an “App for SharePoint 2013” project:
Then, add a new item to your project and select “List”:

You’ll go through a wizzard where you can select if you want to create a list instance, based on an existing template, where you can’t change that template.
Or, if you want to create a list, and a template, that you can change, based on an existing template.
Let’s start with a list based on a template that you can’t change:

Create a list named “CustomList” based on a Document Library template:

Now, let’s choose the other option and create CustomList2:

In this case, you’ll have another step, where you can define your document’s template:

And another step, where you can add more columns, in my case, I add an Attachments column:

Now, I edited my default.aspx file, to include links to my new lists:
<ahref=”/SampleApp06/Lists/CustomList”>CustomList</a>
<ahref=”/SampleApp06/Lists/CustomList2″>CustomList2</a>
Finally, deployed my solution and see my new app with these two Custom Lists.
Office 365 Sharepoint Online – Promoted Sites
If you want to display diferent promoted sites to diferent users or groups, in SharePoint Online My Sites, you can do that with audiences.
Go to your Office 365 SharePoint Online administration, and navigate to “user profiles -> My Site Settings -> Manage Promoted Sites”:

Office 365 Sharepoint Online – External Users
In Office 365 you can give access to your portal, to domain users, or to external users.
To give external users access, you need to go to your office 365 administration, and set your site collection Sharing Properties.

You can define if you want to enable anonymous users or only authenticated accesss:

After saving your settings, you need to go to your Portal, and invite your external users, you need to click on Share, and then enter your external users email and permissions:

Your external users, will receive an invitation email, and after they accept that, they will be able to log on.
You can monitor your invitations at “Site Settings -> Access Requests and Invitations”:

Sharepoint 2007 Workflows Logs
If you have problems in Workflows, you can activate Workflows logs to see which activities are generating errors.
You should do this in two places, one in your SharePoint portal’s web.config file, and also for owstimer process.
For owstimer, you should go to 12\bin folder and create a new file “owstimer.exe.config” with the following code:
<?xml version="1.0" encoding="utf-8"?>

<configuration>

  <system.diagnostics>

    <sources>

      <source name="System.Workflow.Runtime" >

        <listeners>

          <add name = "System.Workflow"/>

        </listeners>

      </source>

      <source name="System.Workflow.Runtime.Hosting">

        <listeners>

          <add name="System.Workflow"/>

        </listeners>

      </source>

      <source name="System.Workflow.Activities">

        <listeners>

          <add name="System.Workflow"/>

        </listeners>

      </source>

    </sources>

    <sharedListeners>

      <add name="System.Workflow"

           type="System.Diagnostics.TextWriterTraceListener"

           initializeData="c:\tracing\WFTrace.log"

           traceOutputOptions="DateTime,ProcessId"/>

    </sharedListeners>

    <switches>

      <add name="System.Workflow.LogToTraceListeners" value="1"/>

      <add name="System.Workflow.Runtime" value="All" />

      <add name="System.Workflow.Runtime.Hosting" value="All" />

      <add name="System.Workflow.Runtime.Tracking" value="All" />

      <add name="System.Workflow.Activities" value="All" />

      <add name="System.Workflow.Activities.Rules" value="All" />

    </switches>

  </system.diagnostics>

</configuration>
For your portal’s web.config file you should copy the system.diagnostics section.
Office 365 Access Services Sample
This post is about how to create an Access Application in Office 365 SharePoint Online.
First you need to create a new Access App. Go to your site menu, and select “Add an app”:
![]()
Select the “Access App” option:

Give your app a name and create it, mine is AccessApp1.
Next click in your new application.

Click to open your new application and start adding tables:

You’ll open your application in Access Client, where you can start adding tables based on access templates or create your tables without any template:

In this case I selected the “Book Collection” template and it automatically created the following tables:

Save your new application and start using it in your SharePoint Online Portal. You’ll have automatically the create, edit, list and delete operations available:

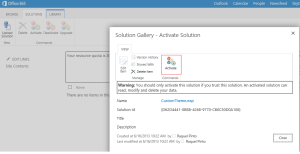
Office 365 Sharepoint Sandbox Solution
This post is to show how to use a sandbox solution in office 365.
I used the Sandbox Solution created in the composed looks sample, and deployed the .wsp to my Office Online SharePoint Subscription.
In my Office 365 SharePoint Portal, I went to Site Settings/ Solutions:

Next, uploaded my wsp file:

Selected the Activate button:
And I can start using my solution features, in this case, my custom composed look:

Sharepoint 2013 Create a Minimal Master Page
To create a minimal Master Page in SharePoint 2013, you can use the Design Manager.

Choose the option “4 – Edit Master Pages” and then “Create a minimal master page”.

Give a name to your page and create it. Next, go to your master pages gallery, and you’ll see your new master page.
You can now, download a copy from your master page, and create a Visual Studio 2012, SharePoint 2013 empty project to deploy your new master page.
You need to add a new module to your project, add your master page file, and configure your elements.xml file:
<?xml version="1.0" encoding="utf-8"?>
<Elements xmlns="http://schemas.microsoft.com/sharepoint/">
  <Module Name="SampleMinimalMaster" Url="_catalogs/masterpage">
    <File Path="SampleMinimalMaster\SM12.master" IgnoreIfAlreadyExists="TRUE" Type="GhostableInLibrary" Url="SM12.master" />
  </Module>
 </Elements>
I made some changes to the original master page, to use the PublishingWebControls:AuthoringContainer control:
<%-- SPG:
This HTML file has been associated with a SharePoint Master Page (.master file) carrying the same name. While the files remain associated, you will not be allowed to edit the .master file, and any rename, move, or deletion operations will be reciprocated.
To build the master page directly from this HTML file, simply edit the page as you normally would. Use the Snippet Generator at http://win-f9pitqqtmf3/_layouts/15/ComponentHome.aspx?Url=http%3A%2F%2Fwin%2Df9pitqqtmf3%2F%5Fcatalogs%2Fmasterpage%2FMinimalTest%2Emaster to create and customize useful SharePoint entities, then copy and paste them as HTML snippets into your HTML code. All updates to this file will automatically sync to the associated Master Page.
--%>
<%@Master language="C#"%>
<%@Register TagPrefix="SharePoint" Namespace="Microsoft.SharePoint.WebControls" Assembly="Microsoft.SharePoint, Version=15.0.0.0, Culture=neutral, PublicKeyToken=71e9bce111e9429c"%>
<%@Register TagPrefix="WebPartPages" Namespace="Microsoft.SharePoint.WebPartPages" Assembly="Microsoft.SharePoint, Version=15.0.0.0, Culture=neutral, PublicKeyToken=71e9bce111e9429c"%>
<%@Register TagPrefix="wssucmui" TagName="MUISelector" Src="~/_controltemplates/15/MUISelector.ascx"%>
<%@Register TagPrefix="wssucw" TagName="Welcome" Src="~/_controltemplates/15/Welcome.ascx"%>
<%@Register TagPrefix="PublishingRibbon" TagName="PublishingRibbon" Src="~/_controltemplates/15/Ribbon.ascx"%>
<%@ Register Tagprefix="PublishingWebControls" Namespace="Microsoft.SharePoint.Publishing.WebControls" Assembly="Microsoft.SharePoint.Publishing, Version=15.0.0.0, Culture=neutral, PublicKeyToken=71e9bce111e9429c" %>
<!DOCTYPE html >
<SharePoint:SPHtmlTag dir="<%$Resources:wss,multipages_direction_dir_value%>" ID="SPHtmlTag" runat="server" >
<head id="Head1" runat="server">
<meta http-equiv="X-UA-Compatible" content="IE=10" />
<meta name="GENERATOR" content="Microsoft SharePoint" />
<meta http-equiv="Content-Type" content="text/html; charset=utf-8" />
<meta http-equiv="Expires" content="0" />
<SharePoint:RobotsMetaTag ID="RobotsMetaTag1" runat="server" />
<SharePoint:PageTitle ID="PageTitle1" runat="server">
<asp:ContentPlaceHolder id="PlaceHolderPageTitle" runat="server">
<SharePoint:ProjectProperty ID="ProjectProperty1" Property="Title" runat="server" />
</asp:ContentPlaceHolder>
</SharePoint:PageTitle>
<SharePoint:StartScript ID="StartScript1" runat="server" />
<SharePoint:CssLink ID="CssLink1" runat="server" Version="15">
</SharePoint:CssLink>
<SharePoint:ScriptLink ID="ScriptLink1" language="javascript" name="core.js" OnDemand="true" runat="server" Localizable="false" />
<PublishingWebControls:AuthoringContainer runat="server" id="AuthoringContainer1" DisplayAudience="AuthorsOnly">
<SharePoint:ScriptLink ID="ScriptLink2" language="javascript" name="menu.js" OnDemand="true" runat="server" Localizable="false" />
<SharePoint:ScriptLink ID="ScriptLink3" language="javascript" name="callout.js" OnDemand="true" runat="server" Localizable="false" />
<SharePoint:ScriptLink ID="ScriptLink4" language="javascript" name="sharing.js" OnDemand="true" runat="server" Localizable="false" />
<SharePoint:ScriptLink ID="ScriptLink5" language="javascript" name="suitelinks.js" OnDemand="true" runat="server" Localizable="false" />
</PublishingWebControls:AuthoringContainer>
<SharePoint:CacheManifestLink ID="CacheManifestLink1" runat="server" />
<SharePoint:PageRenderMode ID="PageRenderMode1" runat="server" RenderModeType="Standard" />
<SharePoint:CustomJSUrl ID="CustomJSUrl1" runat="server" />
<SharePoint:SoapDiscoveryLink ID="SoapDiscoveryLink1" runat="server">
</SharePoint:SoapDiscoveryLink>
<SharePoint:AjaxDelta id="DeltaPlaceHolderAdditionalPageHead" Container="false" runat="server">
<asp:ContentPlaceHolder id="PlaceHolderAdditionalPageHead" runat="server">
</asp:ContentPlaceHolder>
<SharePoint:DelegateControl ID="DelegateControl1" runat="server" ControlId="AdditionalPageHead" AllowMultipleControls="true">
</SharePoint:DelegateControl>
<asp:ContentPlaceHolder id="PlaceHolderBodyAreaClass" runat="server">
</asp:ContentPlaceHolder>
</SharePoint:AjaxDelta>
<SharePoint:CssRegistration ID="CssRegistration1" Name="Themable/corev15.css" runat="server" />
<SharePoint:AjaxDelta id="DeltaSPWebPartManager" runat="server">
<WebPartPages:SPWebPartManager ID="SPWebPartManager1" runat="server" />
</SharePoint:AjaxDelta>
</head>
<body onhashchange="if (typeof(_spBodyOnHashChange) != 'undefined') _spBodyOnHashChange();"><SharePoint:SPClientIDGenerator ID="SPClientIDGenerator1" runat="server" ServerControlID="DeltaPlaceHolderMain;DeltaPlaceHolderPageTitleInTitleArea;DeltaPlaceHolderUtilityContent" /><SharePoint:ImageLink ID="ImageLink1" runat="server" /><SharePoint:SharePointForm ID="SharePointForm1" onsubmit="if (typeof(_spFormOnSubmitWrapper) != 'undefined') {return _spFormOnSubmitWrapper();} else {return true;}" runat="server"><asp:ScriptManager id="ScriptManager" runat="server" EnablePageMethods="false" EnablePartialRendering="true" EnableScriptGlobalization="false" EnableScriptLocalization="true" />
<div id="ms-designer-ribbon">
<div id="TurnOnAccessibility" style="display:none" class="s4-notdlg noindex">
<a id="linkTurnOnAcc" href="#" class="ms-accessible ms-acc-button" onclick="SetIsAccessibilityFeatureEnabled(true);UpdateAccessibilityUI();document.getElementById('linkTurnOffAcc').focus();return false;">
<SharePoint:EncodedLiteral ID="EncodedLiteral1" runat="server" text="<%$Resources:wss,master_turnonaccessibility%>" EncodeMethod="HtmlEncode">
</SharePoint:EncodedLiteral>
</a>
</div>
<div id="TurnOffAccessibility" style="display:none" class="s4-notdlg noindex">
<a id="linkTurnOffAcc" href="#" class="ms-accessible ms-acc-button" onclick="SetIsAccessibilityFeatureEnabled(false);UpdateAccessibilityUI();document.getElementById('linkTurnOnAcc').focus();return false;">
<SharePoint:EncodedLiteral ID="EncodedLiteral2" runat="server" text="<%$Resources:wss,master_turnoffaccessibility%>" EncodeMethod="HtmlEncode">
</SharePoint:EncodedLiteral>
</a>
</div>
<PublishingRibbon:PublishingRibbon runat="server" />
</div>
<SharePoint:SPSecurityTrimmedControl ID="SPSecurityTrimmedControl1" runat="server" AuthenticationRestrictions="AnonymousUsersOnly">
<wssucw:Welcome runat="server" EnableViewState="false" />
</SharePoint:SPSecurityTrimmedControl>
<div id="s4-workspace">
<div id="s4-bodyContainer">
<div>
<SharePoint:AjaxDelta id="DeltaPlaceHolderMain" IsMainContent="true" runat="server">
<asp:ContentPlaceHolder ID="PlaceHolderMain" runat="server">
<div class="DefaultContentBlock" style="border:medium black solid; background:yellow; color:black;">
This area will be filled in by content you create in your page layouts.
</div>
</asp:ContentPlaceHolder>
</SharePoint:AjaxDelta>
</div>
</div>
</div>
<SharePoint:AjaxDelta id="DeltaFormDigest" BlockElement="true" runat="server"><asp:ContentPlaceHolder id="PlaceHolderFormDigest" runat="server"><SharePoint:formdigest ID="Formdigest1" runat="server" /></asp:ContentPlaceHolder></SharePoint:AjaxDelta></SharePoint:SharePointForm><SharePoint:AjaxDelta id="DeltaPlaceHolderUtilityContent" runat="server"><asp:ContentPlaceHolder id="PlaceHolderUtilityContent" runat="server" /></SharePoint:AjaxDelta><asp:ContentPlaceHolder id="PlaceHolderTitleAreaClass" Visible="False" runat="server" /><asp:ContentPlaceHolder id="PlaceHolderTitleBreadcrumb" Visible="False" runat="server" /><asp:ContentPlaceHolder id="PlaceHolderGlobalNavigationSiteMap" Visible="False" runat="server" /><asp:ContentPlaceHolder id="PlaceHolderGlobalNavigation" Visible="False" runat="server" /><asp:ContentPlaceHolder id="PlaceHolderSearchArea" Visible="False" runat="server" /><asp:ContentPlaceHolder id="PlaceHolderLeftNavBar" Visible="False" runat="server" /><asp:ContentPlaceHolder id="PlaceHolderHorizontalNav" Visible="False" runat="server" /><asp:ContentPlaceHolder id="PlaceHolderTopNavBar" Visible="False" runat="server" /><asp:ContentPlaceHolder id="PlaceHolderLeftNavBarDataSource" Visible="False" runat="server" /><asp:ContentPlaceHolder id="PlaceHolderCalendarNavigator" Visible="False" runat="server" /><asp:ContentPlaceHolder id="PlaceHolderLeftActions" Visible="False" runat="server" /><asp:ContentPlaceHolder id="PlaceHolderLeftNavBarTop" Visible="False" runat="server" /><asp:ContentPlaceHolder id="PlaceHolderSiteName" Visible="False" runat="server" /><asp:ContentPlaceHolder id="PlaceHolderPageTitleInTitleArea" Visible="False" runat="server" /><asp:ContentPlaceHolder id="PlaceHolderPageDescription" Visible="False" runat="server" /><asp:ContentPlaceHolder id="PlaceHolderPageImage" Visible="False" runat="server" /><asp:ContentPlaceHolder id="PlaceHolderTitleLeftBorder" Visible="False" runat="server" /><asp:ContentPlaceHolder id="PlaceHolderMiniConsole" Visible="False" runat="server" /><asp:ContentPlaceHolder id="PlaceHolderTitleRightMargin" Visible="False" runat="server" /><asp:ContentPlaceHolder id="PlaceHolderTitleAreaSeparator" Visible="False" runat="server" /><asp:ContentPlaceHolder id="PlaceHolderNavSpacer" Visible="False" runat="server" /><asp:ContentPlaceHolder id="PlaceHolderLeftNavBarBorder" Visible="False" runat="server" /><asp:ContentPlaceHolder id="PlaceHolderBodyLeftBorder" Visible="False" runat="server" /><asp:ContentPlaceHolder id="PlaceHolderBodyRightMargin" Visible="False" runat="server" /><asp:ContentPlaceHolder id="WSSDesignConsole" Visible="False" runat="server" /><asp:ContentPlaceHolder id="SPNavigation" Visible="False" runat="server" /><asp:ContentPlaceHolder id="PlaceHolderQuickLaunchTop" Visible="False" runat="server" /><asp:ContentPlaceHolder id="PlaceHolderQuickLaunchBottom" Visible="False" runat="server" /></body>
</SharePoint:SPHtmlTag>
Sharepoint Power Shell Add Nodes to Quick Launch Navigation
This script will add all Site subSites to QuickLaunch Navigation, in the "Sites" node.


$siteUrl = "http://localhost"
$spWeb = Get-SPWeb $siteUrl -ErrorAction Stop
$quickLaunch = $spWeb.navigation.quicklaunch
$sitesGroup = $quickLaunch | where { $_.Title -eq "<strong>Sites</strong>" }

foreach($subSite in $spWeb.Webs)
{
 $node = New-Object -TypeName Microsoft.SharePoint.Navigation.SPNavigationNode -ArgumentList $subSite.Title , $subSite.Url
 $sitesGroup.Children.AddAsLast($node)
 $spWeb.Update()

}
$spWeb.Dispose()
